Uitsmijter : Fried egg on toast
That’s Dutch, not Spanish. It means “to throw out”.
The name is traditionally said to come from the other meaning of uitsmijter which is “bouncer” (as in nightclubs). This being eaten/served as a late-night/early-morning snack at a cafe or club just before everyone gets kicked out at closing.
- Toasted white bread
- A slice of cheese
- 1 egg; sunny side up (fried in 1 T of good olive oil)
- ham under the egg (optional)
- tomato slices under the cheese(opt)
- salt & pepper
- mustard (opt) (not horrid yellow mustard though)
This has been my favorite quick snack these days. Use fresh eggs (the yolks are more shapely) and keep the yolk runny.
There has been no actual “cooking” going on around here for months. This is the closest I’ve come recently so I’m tagging it as a “recipe”.
del.icio.us Tags: uitsmijter
Tortilla Española, Estilo Nuevo : Spanish Tortilla, New Style : Deconstructed
A deconstructed Tortilla Española (Spanish Tortilla).
Quite different than this normal looking tortilla:
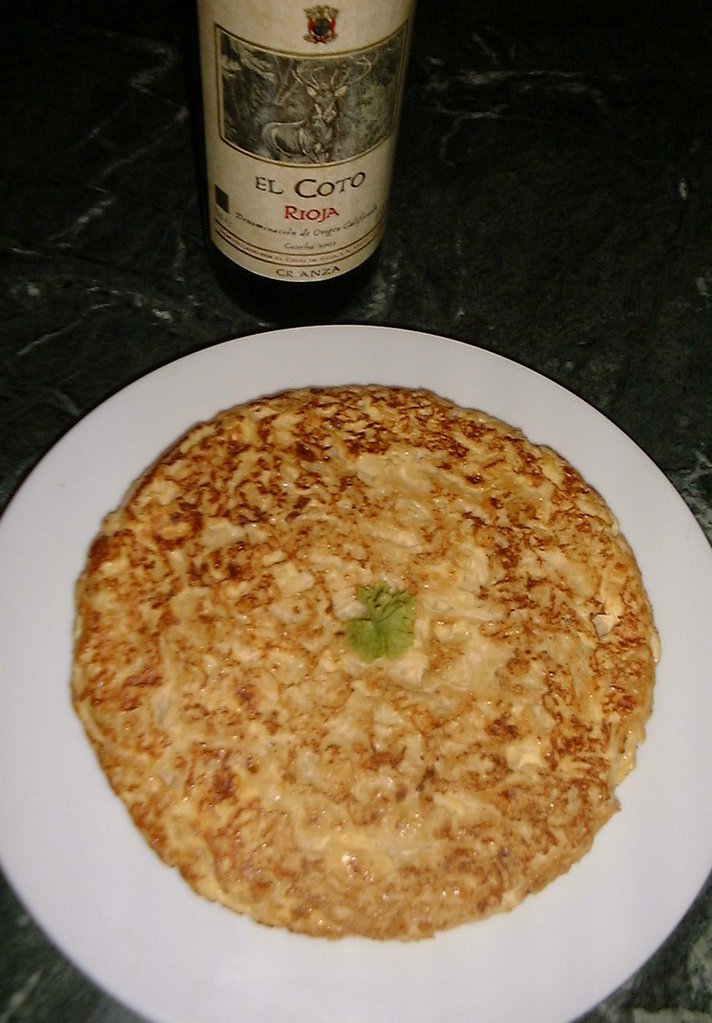
See also a post at Tortilla de Cebolla
Taking a page from Ferran Adrià (chef & sort of mad scientist) and his recipe for a modern tortilla; having three components: caramelized onions, a simple sabayon (egg) and potato foam (yes, that’s foamed potatoes.
Instead of mixing all the ingredients together they are separated and layered over each other. Taste them individually or dig through to the bottom and have all three together.
The following is what I actually did – with slight variance from his original recipe. It’s quite a bit easier than it might look at first glance.
Deconstructed Tortilla Española
Serves: 2
Ingredients
Caramelized Onions
- 1/2 medium onion – julienned, finely sliced
- 4 shallots – julienned, finely sliced (equal in amount to the onion)
- 60 ml olive oil [1/4 C]
- 1 T butter (or a little less)
- 100 ml water [1/2 C]
- salt
Sabayon
- 2 egg yolks
- 2 T boiling water
- salt
Potato Foam
- 150 gr potatoes [1/3 #] (that’s about 1 potato)
- 75 ml cream (heavy/whipping cream) [1/2 C]
- 2 T olive oil
- salt
Procedure
Caramelized Onions
- Oil into a sauté pan, then the butter
- Sauté the onions and shallots slowly, until browning
- takes about 20 minutes
- stirring regularly or, if you have the patience, continuously
- Drain off any excess oil
- Add 1 T of water, stir, and continue until the water evaporates
- repeat: water, stirring, cooking until the water’s gone (this could go for another 20 minutes)
- You’re going for a jam consistency and golden brown color
- Salt to taste
Sabayon
- In a pan, whisk the egg yolks until creamy and consistent
- getting air in the mix is just fine
- Add the boiling water in a drizzle and keep on whisking
- Whisk with enthusiasm over medium heat, maybe use a double boiler, until it’s emulsified
- Don’t stop whisking or you might end up with scrambled eggs
- When it’s ready it will just barely drip from the whisk and be really full of small bubbles
- If you have an instant thermometer it would be 80 C [180F]
- Salt to taste (do not omit this step)
Potato Foam
- Peel, chunk and cook the potatoes until soft
- Start the potatoes in cold, lightly salted water, just enough to cover
- They’re ready when a knife goes in easily and slips out equally so
- Drain over a bowl, saving the cooking water
- Puree/blend the potatoes, with 3 T of the potato-water, and drizzle in the cream
- Then drizzle in the oil, pureeing the whole while
- Until it’s smooth
- Salt to taste (don’t leave out this salt either)
You can stop now and resume later (see notes) or carry on right away.
Now comes the sort of complicated bit; you need a stainless steel whipped cream maker (1/2 liter [quart] size) (or see notes for a possible alternative)
- Strain the creamed potato into the whipper
- Charge (2 cartridges) the whipper
- Set in a pan of hot water, you can put the sabayon there too
Construction
- 1 T (heaping) caramelized onions in the bottom of a tapered glass
- Spoon in sabayon to cover
- Shake thrice and invert the whipper with the potato foam and spurt in a goodly quantity of potato. At least as deep as the other two layers
- Drizzle a little bit of olive oil on top
Done
Notes
- I made everything well in advance and stashed it in the fridge
- The sabayon firmed up quite a bit from the liquidy form it had when I finished making it. That didn’t matter since it was going between two other layers
- Warming the caramelized onions up in a sauté pan
- Warming the sabayon in a bain marie of hot water (just a biggish pot really)
- Warming the creamed potato in a pot, adding a touch (2 T?) of potato-water to make up for absorbed or evaporated liquid
- And then straining and charging the whipper with it and stashing it the bain maire
- The caramelized onions are quite thick and jammy. Don’t put too much in the glass. I probably overdid it.
- In the event that you don’t have a whipper/foamer I imagine you could whip up the creamed potatoes really well and end up with something sort of conceptually similar. Whip in large bowl with and electric whip and whip at the edge of the mixture to incorporate a lot of air. Cover half the top of the bowl with plastic film to avoid a huge mess.
Revuelto de Morcilla : Scrambled Blood Sausage
Catchy title, isn’t it?
My good phone-camera is currently missing and I’m using a backup. One which I have, obviously, not quite figured out. If this pic looks less than appetizing it might be the camera’s fault (or the user thereof) or it might be what you opine regarding the ingredients - - or maybe the appearance of the final dish.
It really is very tasty and it’s not just a made up dish. You can get this in cafés ‘most everywhere.
Revuelto de Morcilla : Scrambled Morcilla
Serves: 4
Ingredients
- oil, for frying, and lots of it
- 1 very large potato (or 2 medium large)
- 1 morcilla (also large)
- 1 green pepper
- 4 eggs, stirred up with a fork
- a dash of salt or two
Procedure
- Peel then cut the potato into very thing julienne strips (we’re talking shoestring/straw potato sized)
- Place in a bowl of cold water, dump the water (essentially a rinse), refill with cold water and into the fridge for 20 minutes
- Peel the skin from the morcilla, cut into 1cm [1/2”] cubes
- De-seed the green peppers and cut into julienne [sticks]
- The strips ought to be on the short side; maybe 4-5 cm [2”]
- Drain the potatoes; fry them up in a lot of hot oil until just turning brown (in a couple or three batches)
- Dump the excess oil once the potatoes are done
- Fry up the green peppers, in a little oil, medium heat, until just softening
- Add a dash of salt
- set them aside
- Fry up the morcilla, in a little oil, until just cooked
- Add the green peppers back, stir it around
- Add the eggs, stir it around until the egg-juice is just set (keep it moist – avoid over cooking and making it dry)
- Salt the shoestring potato straws
- Serve the scrambled up morcilla over a pile of potato straws
Done
Messy and odd looking but good
Notes
- I used fresh Morcilla of Burgos (rice and onion based)
- Chilling the potatoes in the fridge is important. I think this step gets rid of excess starch so the potato straws stay nice and separate
- Red pepper works just fine as well
- Using 5 or 6 eggs would be okay too. I went really quite light on the egg proportion
- Potato straws can be made hours in advance, no problem - - and they’re good all on their own.
Peel an egg
Killer video - got to try this.
Other sources say that the baking soda isn't required.
This is as much to archive the technique for myself as to tell anyone else.
And this one is a wierd approach - but it appears to work.
on
Wednesday, December 17, 2008
1 comments
Labels: eggs
Pisto and Eggs
I seem to be on an egg theme this week.
Went out to dinner at a local cafe/restaurant (a few tables and a bar). Among the dishes offered was Pisto and Eggs (well, one egg).
That’s a nice runny fried egg on top of a dish of pisto (see prior post here). We’re not afraid of less-than-hard-cooked eggs here.
Practically vegetarian – of a sort.
Rice & Egg
A quick lunch. Sort of like Chinese Fried Rice but without the veggies.
The leftover rice from the day before yesterday. Olive oil into a pan (just a touch), rice into pan, heat it up, salt and pepper, crack an egg into it, stir. In this case formed into a sort of omelet shape.
I was thinking of adding cheese bit who needs the cholesterol? Maybe fry up a little Serrano ham or bacon to go along with it.
If this had about 3 eggs instead of just one and was made with potatoes instead of rice it would strongly resemble a Spanish Tortilla [frittata].
This week’s been really down to the simple, the basics, of surviving in the kitchen with minimum effort (and not going out to eat [no time]).
But… the web site I’m coding is looking not too bad - so it balances out. This weekend I might have to take myself out to dinner to make up for a whole slew of mediocre eating - - or I’ll go for a pizza someplace.
Eggs & Rice
The continuing adventures of blindingly simple meals. Today, lunch, a favorite Spanish midday combination.
Simple enough (not as simple a microwaving something, but still…). Rice - I used “Bomba” rice; it’s a bit like rice for rissoto; short, plumps up well, absorbs liquid like crazy. Cooked that with some oil and a couple of crushed garlic cloves in the bottom of the pan. 2 1/2 parts liquid to rice; 15 minutes. Added a bullion cube that was lying around the cupboard to add flavour and salt. Fried an egg, very soft, in an excess of oil (those who fear less than hard cooked eggs are advised to avoid this dish). Egg on top of rice. Take your fork to it and get all that runny egg yolk all over the place.
Egg Whites

Best whipped in a gigantic copper bowl with a huge whip - by hand. Better than a machine any old day.
They say the copper reacts somehow with the whites; no cream of tartar needed.
on
Saturday, July 12, 2008
0
comments
Labels: eggs
Snow Eggs with Caramel and Crème Anglaise : Oeufs à la Neige : Lesson 8 : Part 4 : LCB at Home
Le Cordon Bleu at Home cooking continues. Dessert is a favorite but often tricky to execute; as this one was. It will be repeated in the (near) future to get the "snow eggs" to come out right. It also has yet more Crème Anglaise (vanilla custard); about the fifth week in a row - - and this one finally came out just exactly correctly.
These don't look too bad from this angle but the white eggy things on the middle ought to have been puffier - - they sort of fell flat in this instance. A second little problem was that the caramel was a little on the crunchy side - - would have been better if it was a wee bit softer to the tooth. And finer caramel threads would have been classy too.
But were good anyway.
What went on in this dish is the following:
Oeufs à la Neige : Snow Eggs with Caramel and Crème Anglaise
Serves: 6
Ingredients
- 2 Cups Crème Anglaise
- 1 C cream, whole
- 1 C milk
- 1 t vanilla
- 1/2 t flour
- 4 yolks
- 1/4 C sugar
- Meringue
- 4 egg whites
- 4 T sugar
- Caramel
- 1/2 Cup sugar
- 2 T water
Procedure
- Make some Crème Anglaise (same procedure as back in "an earlier recipe") and stick in the fridge to cool and set some more
- Make the meringue:
- Beat whites until stiff
- Add sugar - gradually
- Beat again until you have them making stiff peaks
- Now the tricky part - the Snow Eggs
- take a large tablespoonful, oval, egg shaped sort of (but not egg sized) of meringue
- drop into simmering water - for 3 minutes (it'll puff up)
- turn it - 3 minutes more
- until cooked completely - the surface of them will change texture
- remove with a slotted spoon and drain on a kitchen towel (paper towels absorb rather too dramatically)
- Stick them in the fridge (or not)
- Caramel (just before serving)
- Melt sugar and water slowly in a pan (see also Lesson 2)
- Until it slightly darkens
- Plunge base of pan into cold water (that's important) to stop the cooking
- Presentation:
- Vanilla Custard (crème) on a shallow plate
- 2 egg things in/on top of the custard (or more... you'll have lots)
- drizzle caramel threads over the eggs & custard
- enjoy
Done
Notes
- Putting a half teaspoon of flour into the mixture is reported to help prevent the custard from "breaking" later while thickening it. It absolutely means that you must remember to sieve the custard when its done.
- Cooked the custard bizarrely slowly and it did, eventually, thicken up to properly coat the back of a spoon. The last few weeks have been sort of runny custards but they were being mixed with gelatin so no one noticed.
- The snow eggs deflated as they hit the towel in my case. Probably from not being fully cooked enough - - that being because they were way too big to start with
- The caramel, if it hardens up on you in the pan before serving, can be recovered by adding a tablespoon of water and reheating/melting it.
on
Thursday, June 05, 2008
0
comments
Labels: dessert, eggs, LCB at Home, recipe
Crème Caramel : Caramel Custard : LCB at Home : Lesson 2 : Part 1
This one's magic and not very difficult; which is why. no doubt, that it's such a popular dessert in restaurants. Easy for the kitchen to produce and a sort of flashy result.
You'll notice that the custard plate is sitting on the Le Cordon Bleu: At Home cookbook. I also referenced other sources for this dish and some were more "pure", using vanilla bean instead of extract; some advised straining the custard before pouring into the molds; thus, they're not identical in detailed technique or have exactly the same ingredients but all are the same in the basics and in the classic-ness of the result. That is to say... delicious.
Onwards. Read the whole recipe before starting. It's not complicated but does need to be done step by step.
What I actually did was...
Crème Renversée au Caramel : Caramel Custard
Serves: 6
Ingredients
Caramel
- 2/3 C sugar
- 1/3 C water
Custard
- 2 C milk (it was 2% - yuck)
- 2 T cream (there, that's better)
- 1 1/2 t vanilla extract
- 2 eggs
- 4 egg yolks
- 2/3 C sugar
Procedure
- Oven to 175 C [350 F]
- Have your custard cups standing by
- Have an ice bath for the saucepan on standby
- Make the caramel
- Water and sugar into a small saucepan
- Heat on low, stir more or less constantly until the sugar granules are dissolved
- Remain on low or medium-low heat until the mix starts to boil
- Crank to high, watch it boil, not stirring, not anything, until the edges of the syrup start to colour [color]
- Continue watching, nervously, as the change overcomes the syrup - it can be quick once it starts so you ought to be paying attention
- Lower to medium if you're concerned about burning it
- Give the pan a little swirl to even out the color if you feel like it
- Once it reaches a good golden brown take it off the heat and dunk the base into the ice bath to stop it cooking
- Working quickly, pour some caramel into one ramekin (custard cup), give it a swirl to cover the bottom and part way up the sides
- Do the other custard cups (ramekins) too - and quickly - this caramel sets up hard pretty fast
- Set the finished cups aside for later - it keeps for days, no problem
- Put a pot of water on to boil (you need it later)
- Make the custard
- Another, probably bigger, saucepan with the milk and vanilla
- Boil briefly and remove from the heat
- Mix the eggs together in a heatproof bowl. Don't get them foamy when mixing
- Add the sugar to the eggs, whisking/mixing gently to a nice sludgy effect
- Gradually whisk the quite warm milk into the egg/sugar mixture (again, avoid a lot of foamy action while whisking)
- Pour the resultant custard into the ramekins
- Place the ramekins in a deep, heatproof, pan - add (hot/boiling) water 2/3 the way up the sides of the cups
- On top of the stove - heat the pan to a light, slight, simmer
- Then into the oven with it for 30 minutes
- Check that the custard is "set" - slip a knife into the custard top - it must come out clean
- Wait another 10 minutes, check again
- Wait 5 more, check again
- and again - - Ah ha! They're ready!
- Remove from oven, remove from water bath, let cool - the cooked custards keep for days, no problem
- To serve
- cut completely around the edge of the mold/cup/ramekin
- place a plate over it
- flip the two
- tap the underside of the plate (gently)
- lift mold
- The caramel will magically be melted and run all over the top (the former bottom) of the custard
Done
Notes
- If the milk mixture if boiling hot going into the egg mixture you will be making sweet scrambled eggs
- The water bath (bain marie) must never have the water boiling, not even simmering hard. It messes up the texture of the custard
- Don't worry about the marks the knife makes from testing the custards for done-ness; they end up on the underside of the dish when you flip it over to serve
- The custard must be completely cooked to be able to hold its form when flipped; don't skimp on the "doneness" of this dish. Medium rare won't serve your purposes. It could take up to 45/50 minutes to cook.
- In the unlikely event that the custard fails try the recipe again- but add a 1/4 t of flour to the egg mixture (it's has to do with the protein binding of the egg or something)
on
Thursday, April 24, 2008
1 comments
Labels: custard, eggs, LCB at Home, recipe
Eggs with Béchamel, Chocolate Mousse : LCB at Home : Lesson 3 : Part 1
Two less than stellar pictures; my own camera/phone was discharged - used a loaner.
First up was - Gratin of Hard-Boiled Egg : Oeufs à la Tripe
that would be "Eggs, Tripe-style"
Second was:
Chocolate Mousse with Hazelnuts and Whisky : Mousse au Chocolate aux Noisettes et au Whisky
Opinions were: Eggs needed more salt & that they resembled Eggs Benedict; Chocolate Mousse was very intense, could have been in servings half the size and a modern treatment would have been much lighter.
Onwards to ... "what I actually did"
Gratin of Hard-Boiled Egg : Oeufs à la Tripe
Serves: 6
Ingredients
- 10 eggs (large, probably)
- 3 T butter (not margarine) [45 gr, 1.5 oz]
- 1 large onion, julienne [sliced thinly]
Béchamel
- 3 T butter (not margarine) [45 gr, 1.5 oz]
- 5 T flour (white, all purpose) [45 gr, 1.5 oz]
- 1/2 t salt
- 1/2 t white pepper, freshly ground
- 2 giant dashes of freshly grated nutmeg [1/4 of a nut]
- 2 C milk
Procedure
- Hard boil the eggs, peel, hold in warm water (I did this way in advance)
- 3 T butter into a pan - saute the onions - until soft but not colored (do this way in advance too)
- Make the béchamel:
- 3 T butter onto a saucepan, melt
- add flour, whisk around for 3 minutes; not too hot - avoid coloring the "roux" [flour & butter mixture]
- whisking all the while, add the milk, bring to a boil, keep whisking
- simmer it well for 10 minutes, keep on whisking, although gently now,
- switch to a wooden spoon for stirring the béchamel and add the sautéed onions, stir for 5 minutes more
- Pour a thin layer of béchamel into a gratin dish (or, in my case, 4 little ones)
- Sliced the eggs thin-ish, lay out in the dish
- Cover with more béchamel
- Stick under a broiler until browned (not burnt [like half of mine did])
Done
Notes
- Béchamel sauce is pretty easy to do, way way cheaper than store bought, and tastes distinctly better. Try it.
- Béchamel is one of the basic "mother" sauces in cuisine. One you've got it down you can vary it to do loads of other interesting stuff
- Hard boiling eggs: lots of ways to do it. Today it was boil some salted water, lower eggs into boiling water using a slotted spoon, bring water back to a boil, lower to a simmer for 9 minutes, run under cold water to stop the cooking.
- Do 11 eggs because one is certain to crack horribly and leak 3/4 into the water.
- If there's no real milk in house enhance each cup of skim or 2% or other fake milk with a couple of tablespoons of cream
- All the whisking of the béchamel is to get it light a and fluffy and to avoid lumps
- When the béchamel was ready I put it on hold by rubbing a patty of cold butter on the surface to prevent a skin from forming
- I revived the béchamel when I was plating the eggs by stirring, over a low heat, and adding enough additional milk to thin it back to a "thick sauce" consistency.
- After burning the béchamel while boiling on 2 of the little gratin dishes I peeled off the burnt "bech" and re-broiled them; no problem at all.
This post has taken quite a while to write; I'll publish it and get back to the thing about the Chocolate Mousse later.
on
Thursday, April 17, 2008
0
comments
Labels: eggs, LCB at Home, recipe