Lesson 4 : LCB at Home : Gigot d´Agneau : Roast Leg of Lamb

On to lesson 4 of the, by know well known, tome: Le Cordon Bleu: At Home - Probably my favorite cookbook.

Tomorrow's meat is number three from the picture

The menu will be:

Smoked Salmon Crepes : Crêpes au Salmon Fumé

Swiss Shard Gratin : Gratin de Blettes

Roast Leg of Lamb : Gigot d´Agneau

Pineapple Sorbet : Ananas Givré

Crepes - a cinch.
Just love the name "Blettes" for a vegetable.
Roasting is simple enough.
Will be making the "sorbet" without the aid of an ice-cream making machine.

Techniques and evaluations starting tomorrow; with the new way of writing the blog entries (less recipe ingredients and more about what goes on in the kitchen) there might be some real content in the post. There will be, at least, pictures. Truth be told, the sorbet is already in process.

Have seriously blown the food budget for April with this project. Not that the food's at all expensive in these menus but doing 4 multistage dinners, for 6, in a month is quite a lot of ingredients being bought. Kilos of butter and cream just for starters - dozens of eggs.

Veal Scallops with Apples and Calvados : Escalopes de Veau Vallée d'Auge : LCB at Home : Lesson 2 : Part 3

Then there's the "main" course - the veal - with roasted apples and a mushroom sauce.

veal 230420081213

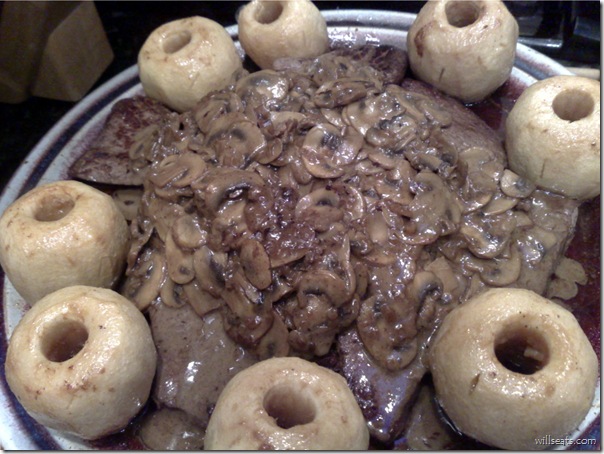
The veal is hiding under the mushroom/cream sauce; trust me, it's under there somewhere.


A big hit; the apples went over real well for something so deadly simple (must be the butter). The crème fraiche and the mushrooms "made" this meal.

And here we go - rough notes on... what I really did - and look down to the "Notes" section (after the Procedure section) if things appear to be confusing - they sort of were at moments.

Veal Scallops with Apples and Calvados : Escalopes de Veau Vallée d'Auge

Serves: 7

Ingredients

  • butter
  • 1/2 kg [1 #] button mushrooms, sliced thin
  • crème fraiche (there's a whole convoluted story about that later on)
  • 7 veal cutlets (although it calls for "veal scallops" and I obviously did not want "veal scallopini" because they're way way too thin). It was 1 kg [2 1/4 #]
  • butter, more (surprised !? - no, not really)
  • olive oil
  • shallots, bruinoise
  • calvados
  • créme fraiche, more

Procedure

  1. Make crème fraiche (yes, make it - since none is available, apparently, in all of Greater Toronto or the surrounding region [hmm, that might be a slight exaggeration]) - see the Notes, it takes a day
  2. In butter, cook the sliced mushrooms until dry-ish; add some (1/4 C) crème fraiche - salt and pepper - set aside (did this way ahead)
  3. Coat the cored, peeled, apples with melted butter (no sugar) and bake at 225 C [450 F] for 15 or 20 minutes - tender but not smooshy
  4. Smash the veal cutlets to flatten them out some (evenly), season (salt & pepper) - not thin, but even
  5. Sauté the veal (very hot) in butter and oil (about 50/50). Enough, all at once, in the pan that the pieces are not touching. Do in batches, cover "done" ones with foil. Drain excess fat off between batches (except the last batch). Don't cook past "medium" - they'll be tough. Err on the low side of doneness.
  6. Remove the last batch of meat (& cover the meat). Toss the diced shallots in the sauté pan; cook 'til tender & not colored (lower the heat probably).
  7. Deglaze with Calvados - in fact, flambé the calvados (first turning off the exhaust fan, please), in fact, have a sip of calvados (it's by the way, a sort of apple brandy)
  8. Add the previously prepared mushrooms,
    the rest of the crème fraiche,
    boil for a minute or two,
    add back in the juices from the "waiting" veal,
    continue boiling for a minute (or, in my case, four) to reduce to a nice saucey consistency
  9. Serve, sauce over the veal, with the apples artfully surrounding the veal on the serving platter.
Done

Notes

  1. Crème Fraiche, is French and translates as "Fresh Cream" but it's not. It's fermented cream. It's sort of thick like sour cream but it's not sour. It's not widely available. It doesn't separate/curdle if boiled (normal cream or milk usually does). It's easy to make/fake.
    For 1 Cup (as used in this recipe)
    1. 1 C cream, whipping, 35%
    2. 2 T buttermilk
    3. 24 hours, covered, at room temperature (to thicken)
  2. Allocate 1 apple per person, plus 2 apples for good luck. The apples should be grouped in a pan that just barely fits the whole lot of them. Cook until just about done then "hold" in the turned off oven until the veal's ready. They're done only with butter. Golden Delicious apples worked for me.
  3. The veal "scallops"...don't exist (well, not here they don't). So I got cutlets; good thick ones too. They were sized at 3 to the pound; I got 7 of them. Once at the house they suddenly looked really large, about 6 ounces each [180 grams], so I cut each one in half. That make 14 (fourteen) pieces of meat! Way out of line with what people would eat. Ended up cooking 12 pieces in total; really could have got away with just 10 for 7 people.


I finally figured out that I ought not be writing the whole recipe straight out of the book (the book being Le Cordon Bleu: At Home) - it's their recipes I'm following as exactly as I can and I'm not injecting much original content. I might get stomped by some intellectual property lawyer types some day if I just write out their recipes - so, I'm going to go to the style of reporting "what I actually did" but leave out the part where I copy from their book. It is, after all, only fair. So, rush out and buy their book so you can follow along.

There will be lots, still, about the ingredients, tips, tricks and what went right, wrong, or otherwise during the experiments (meals); and what the victims (guests) liked - or not. We'll see if this style of presentation flies.

Final note: The blog, for the first time, has exceeded 1000 unique visitors this month (April); rarified atmosphere. Thanks and welcome to you all.

Technorati Tags: ,
del.icio.us Tags: ,

Country-Style Soup : Soupe Villageoise: LCB at Home : Lesson 2 : Part 2

A leek and cabbage soup; got surprising raves for such a simple little thing.

Soup 230420081210

The fun was to make the stock from scratch; dead simple, as such things so often are once you have some sort of a technique to do it. It can be made well in advance (couple of days) so the assembly at the last moment is not a big sweat at all.

Purports to serve 6 - could serve 10. It's a very produce-filled bowl; lots of cabbage and leeks and only a relatively small amount of liquid. Next time I'll put in more stock to start with.

What I actually did was...

Soupe Villageoise : Country-Style Vegetable Soup with Noodles

Serves: 6
Ingredients
Stock
  • 1 chicken (chop head off, separate neck and feet from body [for more compact occupancy of the stock pot])
  • 3 L water [3 quarts]
  • 2 celery stalks
  • 6 springs parsley (big ones, stems and all)
  • 3 carrots (generous sized)
  • 2 onions (medium)
  • 3 cloves (of clove)
  • 6 cloves garlic
  • 1 bay leaf
  • 1 t salt
  • 12 peppercorns, black
Soup
  • 1/4 C butter (unsalted of course)
  • 1/2 cabbage (1/2 a medium size that is)
  • 1/4 C butter (need I repeat myself?)
  • 1 kg leeks [2 #]
  • 8 C stock
  • salt
  • pepper
  • 1 C vermicelli noodles
  • parsley for sprinkling
Procedure
Stock
  1. Truss chicken [wrap with string]
  2. Cut onions and veggies in 2 (or maybe 4) (big chunks)
  3. Put chicken into a very big pot
  4. Put the veggies and everything else into the pot too
  5. Put a lot of water into the pot as well (see note 1)
  6. Bring to a boil
  7. Reduce to a simmer
  8. Skim off the scum and froth and fat that rises to the top (yucky)
  9. Continue simmering for an hour
    • Skim as necessary
  10. Remove the chicken (save it for something; see note 2)
    • add more water now if it all didn't go in earlier
  11. Simmer for another 1 1/2 hours (skimming)
  12. Remove some of the large chunks of veggies with a slotted spoon (prevents splashing in the following step)
  13. Strain (best would be a fine strainer but I didn't have one)
  14. Cool, uncovered, the resultant, golden, stock as quickly as possible (see note 3)
Soup
  1. Big pot of water on the boil (for the cabbage)
  2. Remove out cabbage leaves, remove hard center, quarter it, rinse it, drain, julienne (slice in fine strips [little-finger wide])
  3. Blanch in boiling water for 5 minutes, drain
  4. Butter into a large pan, low
  5. Cabbage into the pan, coat with butter
  6. Cook, covered, until soft (but not colored - thus the low heat)
    • stir once in a while
  7. Leeks, use the white and first third of the green
  8. Clean leeks (the usual way [see notes]), slice thin (thinner than the cabbage)
  9. Butter into a pan (for leeks), low heat
  10. Leeks go in, coat, cover, cook - until soft (& not colored)
    • stir once in a while
  11. Then, leeks, cabbage and stock into a big soup pot, high heat
  12. Boil, reduce to simmer
    • 40 minutes will do it
  13. Season (salt and pepper) (use enough salt this time, please - and a touch more pepper - don't be afraid)
  14. When ready to serve
    1. add the vermicelli,
    2. get it all boiling,
    3. simmer 5 minutes ('til vermicelli is done)

Done

Notes
  1. If there's not enough space for all the water at once put in as much as possible and add the rest later when the stock has boiled down and you pull the chicken out
  2. I made croquettes
  3. To cool quickly plug sink, put pot in sink, surround with ice cubes from your refrigerator ice machine
  4. Cleaning leeks:
    1. Remove the ugly bottom root, and much of the useless green
    2. quarter the thing vertically from 1" [2 cm] from the bottom to the top (it'll look like a feather duster if you use your imagination)
    3. rinse under running water, hanging upside down (the leek, not you) to get out the inevitable dirt from between the leaves
del.icio.us Tags: ,,
Technorati Tags: ,,

Crème Caramel : Caramel Custard : LCB at Home : Lesson 2 : Part 1

This one's magic and not very difficult; which is why. no doubt, that it's such a popular dessert in restaurants. Easy for the kitchen to produce and a sort of flashy result.

Creme Caramel 230420081215

You'll notice that the custard plate is sitting on the Le Cordon Bleu: At Home cookbook. I also referenced other sources for this dish and some were more "pure", using vanilla bean instead of extract; some advised straining the custard before pouring into the molds; thus, they're not identical in detailed technique or have exactly the same ingredients but all are the same in the basics and in the classic-ness of the result. That is to say... delicious.

Onwards. Read the whole recipe before starting. It's not complicated but does need to be done step by step.
What I actually did was...

Crème Renversée au Caramel : Caramel Custard

Serves: 6
Ingredients
Caramel
  • 2/3 C sugar
  • 1/3 C water
Custard
  • 2 C milk (it was 2% - yuck)
  • 2 T cream (there, that's better)
  • 1 1/2 t vanilla extract

  • 2 eggs
  • 4 egg yolks
  • 2/3 C sugar
Procedure
  1. Oven to 175 C [350 F]
  2. Have your custard cups standing by
  3. Have an ice bath for the saucepan on standby
  4. Make the caramel
    1. Water and sugar into a small saucepan
    2. Heat on low, stir more or less constantly until the sugar granules are dissolved
    3. Remain on low or medium-low heat until the mix starts to boil
    4. Crank to high, watch it boil, not stirring, not anything, until the edges of the syrup start to colour [color]
    5. Continue watching, nervously, as the change overcomes the syrup - it can be quick once it starts so you ought to be paying attention
    6. Lower to medium if you're concerned about burning it
    7. Give the pan a little swirl to even out the color if you feel like it
    8. Once it reaches a good golden brown take it off the heat and dunk the base into the ice bath to stop it cooking
  5. Working quickly, pour some caramel into one ramekin (custard cup), give it a swirl to cover the bottom and part way up the sides
  6. Do the other custard cups (ramekins) too - and quickly - this caramel sets up hard pretty fast
    • Set the finished cups aside for later - it keeps for days, no problem
  7. Put a pot of water on to boil (you need it later)
  8. Make the custard
    1. Another, probably bigger, saucepan with the milk and vanilla
    2. Boil briefly and remove from the heat
    3. Mix the eggs together in a heatproof bowl. Don't get them foamy when mixing
    4. Add the sugar to the eggs, whisking/mixing gently to a nice sludgy effect
    5. Gradually whisk the quite warm milk into the egg/sugar mixture (again, avoid a lot of foamy action while whisking)
  9. Pour the resultant custard into the ramekins
  10. Place the ramekins in a deep, heatproof, pan - add (hot/boiling) water 2/3 the way up the sides of the cups
  11. On top of the stove - heat the pan to a light, slight, simmer
  12. Then into the oven with it for 30 minutes
    • Check that the custard is "set" - slip a knife into the custard top - it must come out clean
    • Wait another 10 minutes, check again
    • Wait 5 more, check again
    • and again - - Ah ha! They're ready!
  13. Remove from oven, remove from water bath, let cool - the cooked custards keep for days, no problem
  14. To serve
    1. cut completely around the edge of the mold/cup/ramekin
    2. place a plate over it
    3. flip the two
    4. tap the underside of the plate (gently)
    5. lift mold
    6. The caramel will magically be melted and run all over the top (the former bottom) of the custard

Done

Notes
  1. If the milk mixture if boiling hot going into the egg mixture you will be making sweet scrambled eggs
  2. The water bath (bain marie) must never have the water boiling, not even simmering hard. It messes up the texture of the custard
  3. Don't worry about the marks the knife makes from testing the custards for done-ness; they end up on the underside of the dish when you flip it over to serve
  4. The custard must be completely cooked to be able to hold its form when flipped; don't skimp on the "doneness" of this dish. Medium rare won't serve your purposes. It could take up to 45/50 minutes to cook.
  5. In the unlikely event that the custard fails try the recipe again- but add a 1/4 t of flour to the egg mixture (it's has to do with the protein binding of the egg or something)

Crème Caramel

Today's dessert.   Too fulfilled / sated to write a whole blog post...

Creme Carm 230420081216

And too lazy.   I'll write about this when I have energy - tomorrow.

Analysis reveals that this is eggnog, minus nutmeg, plus a water bath in the oven - and some caramel.  It won raves from the attendees.

Lesson 2 : LCB at Home : Country-style Soup, Veal Scallops, Caramel Custard

We go to lesson 2 of the book : Le Cordon Bleu: At Home

chicken 200420081202

What's this got to do with a chicken you might ask? In particular, a whole (feet and head included) version of a chicken?

In the spirit of "know your food" I figured I'd get myself a chicken that looked like one; it was to make the chicken stock for the 1st dish (soup). Ugly critter, isn't it?

The menu tomorrow will be:

Country-Style Soup : Soupe Villageoise : Country-Style Vegetable Soup with Noodles

Veal Scallops Vallée d'Auge : Escalopes de Veau Vallée d'Auge: Veal Scallops with Apples and Calvados

Caramel Custard : Créme Renversée au Caramel : Caramel Custard

There's three names in each item above because I give three versions of the name of each dish: What I would use on a menu : French title from the book : English title from the book

Back stories:

  • villageoise = villager
  • Vallée d'Auge-style (the Auge valley in Normandy) = prepared with créme frâiche and calvados
  • creme renversée = flan (more or less)

The veal "scallops" I ordered were sold to me under the denomination of Veal Cutlets. Not sure what the difference is.

Recipes and evaluations starting tomorrow.

Ratatouille Niçoise : Nice-Style Ratatouille : LCB at Home : Lesson 44 : Part 0

Why "Part Zero" in the title? Because I jumped forward a whole lot of pages in the book to pick up an unscheduled recipe. Needed a vegetarian alternative with the veal shanks last week and selected ratatouille as being popular, simple, and I could compare the French version of it to my regular Spanish variant.

It didn't work out as planned; less French, more Spanish and rather smooshy in the eggplant and zucchini category - because I messed up on one step of the recipe. Reports were that it did taste good even though it looked not wildly appealing . . . like this:

Ratatouille 012

We learn from our mistrakes. What I actually did was...

Ratatouille Niçoise : Nice-Style Ratatouille

Serves: 7
Ingredients
  • 1/4 C olive oil
  • 500 gr eggplant [1#]
  • 500 gr zucchini [1#]
  • 1/2 C olive oil
  • 1 green pepper
  • 1 yellow pepper
  • 2 large onions, julienne [sliced]
  • 6 cloves garlic, finely chopped
  • 1 bay leaf
  • 1/4 t dried thyme (made from last week's fresh thyme)
  • 2 t dried basil
  • 500 gr tomatoes, peeled, seeded, diced
  • 2 t dried rosemary leaves
  • 1 T tomato paste
  • salt
  • pepper
Procedure
  1. Cut eggplant and zucchini into 4cm x½cm bâtonettes [1½ " x ¼" sticks]
  2. De-seed & cut pepper into similarly sized strips
  3. 1/4 C oil into a pot & sauté eggplant and zucchini, remove from pan (this is where I messed up - see notes)
  4. 1/2 C of oil into the pan
  5. add onions & peppers
    • cook until soft (not colored)
  6. Add back the eggplant/zuch mix
  7. Add the garlic, herbs, tomatoes and the rest of the stuff - salt and pepper to taste
  8. Simmer, don't stir, for 20 minutes
  9. Taste, re-season (probably add a little salt)
Done
Notes
  1. The error: the "sauté" step. I put the eggplant and zucchini into the pot and there was barely room for it all. So I added more oil (in the Spanish fashion) to coat it all and basically stewed the stuff in its own juices (and a bunch of oil). The correct thing to do would have been... use a really big frying pan and, with just a touch of oil, do a proper sauté in several (many) small batches of the zucchini and eggplant; browning each one golden and retaining their shape/firmness. Then the whole dish would have very looked nice after the step where you cook everything for 20 minutes without stirring - right?
    • There's also the possibility that I misread the weights of the veggies and had 1 Kilo instead of 1 Pound of vegs. This country (Canada) randomly mixes metric and imperial measures of weights.

More or less from Le Cordon Bleu: At Home page 247 or thereabouts

del.icio.us Tags: ,
Technorati Tags: ,

Veal Shanks Bourgeois : Roulles de Veau Bourgeoise : LCB at Home : Lesson 3 : Part 3

These were very very good - a success one might say - and several did.

Veal Shanks 2 011

Forgot to snap the picture until after they started serving - in the upper left of the shot you can see some already portioned out. As for the cooking, what I actually did was...

Veal Shanks Bourgeois : Roulles de Veau Bourgeoise : Veal Shanks with Pearl Onions and Mushrooms

Serves: 7
Ingredients
  • 7 veal shanks (good sized ones), or a 2 kg piece [4 #] sawn into 7 slices; each about 4 cm [1.5 inches] thick
  • 60 g butter [4 T, 2 oz]
  • 30 g flour [1/4 C, 1 oz]
  • 1 Bouquet Garni
    • 4 twigs dried thyme, 10 cm celery top [4"], 1 bay leaf, 4 sprigs parsley (biggish), wrapped in 2 pieces of the green part of the stalk from a leek, tied with twine/string
  • 1 1/2 t Salt
  • 1 t Black pepper, freshly ground

  • 15 g butter [1 T, 0.5 oz]
  • 350 g little button mushrooms, trimmed and cleaned[12 oz]

  • 30 pearl onions, peeled
  • 1 clove

  • 2 egg yolks
Procedure
  1. Veal shanks into a big enough pot, cover with water, bring to a boil
  2. Reduce to a simmer - simmer for 15 minutes
  3. Skim the (inevitable) gunk floating on the top of the water
  4. Remove veal, set aside
  5. Strain the cooking liquid (and save it for later)

  6. Butter into a big frying/sauté pan (big enough to hold all the meat), medium heat
  7. Add flour, whisk for a couple of minutes (avoid browning this "roux")
  8. Whisk in 2 cups of the reserved cooking liquid
  9. Return veal to the pan (I had to stack it in two layers - doesn't matter)
  10. Add more cooking juices to just cover the veal (thus, a single layer would have been better)
  11. Bring slowly to a boil
    • moving things around to keep the flour from sticking to the bottom
  12. Reduce to a simmer
  13. Add the bouquet garni
  14. Add salt and pepper (remember to taste again before the end)
  15. Simmer for 45 minutes

  16. Meanwhile, 1 T of butter into a frying pan, high heat
  17. Add mushrooms
  18. Saute vigorously until they A) start giving off their liquids and B) that liquid has evaporated from the pan
  19. Set aside to add to the meat stew later on

  20. After the 45 minutes mentioned above, stick the clove into one of the onions & add the onions to the meat pot
  21. Simmer for 15 minutes more
  22. Check, with the point of a small sharp knife, that the meat is tender

  23. Here's a tricky bit - 5 minutes before the meat is ready (you'll have to guess) add the mushrooms
  24. When done, almost falling from the bone, remove the meat to a platter (leaving behind all the liquid)
  25. Remove the onions and mushrooms (decorate around the meat)
  26. Cover with foil to keep in the heat

  27. Reduce the cooking liquid by a third or a half (mine was 2 layers deep so I had a lot of liquid to reduce)
  28. Egg yolks: whisk (with a fork?) together with a ladle of the (hot) cooking liquid (called "tempering" the yolks)
  29. Dump this mixture into the main pot, whisking over medium heat, bring it just to a boil again - remove from heat
  30. Taste it - add salt probably - maybe some pepper
  31. Pour over the veal, onions, mushrooms

Done

Notes
  1. This is all really easier than it might seem with the number of steps in the procedure
  2. Veal shanks are also known as ossi buchi, osso bucco, veal shin or/and "hind cut"
  3. Straining is best done with a somewhat fine sieve (better that than a colander)
  4. This is more or less a really simple veal stew
  5. The bouquet garni content might vary in other recipes; for example, this one contains no peppercorns - it's fairly typical
  6. Pearl onions are sometimes known as pickling onions. They're tiny.
    • If the onions and the mushrooms are about the same size that's visually satisfying
  7. Feel free to substitute regular mushrooms, quartered, for button mushrooms
  8. The cooking liquid becomes the "gravy"/sauce for this dish so reduce to the amount which seems appropriate for serving with the quantity of meat you've got and the gravy lovingness of those at the table
The Short Version
  1. Simmer shanks until tender
  2. Half way, do a roux of with some of the liquid
  3. Add bouquet garni and season
  4. Half way through the rest add onions (& the clove)
  5. Meanwhile, sauté-dry the mushrooms (add at almost the end)
  6. Remove meat. reduce liquids
  7. "liaison" the sauce with egg yolks ("temper" the yolks first)

del.icio.us Tags: ,

Technorati Tags: ,

Chocolate Mousse : LCB at Home : Lesson 3 : Part 2

Carrying on from the post yesterday, which was taking entirely too long to write so I split that in two - this is the second bit.

This mousse dessert turns out to be quite easy to do - worth trying at home.

Chocolate Mousse with Hazelnuts and Whisky : Mousse au Chocolate aux Noisettes et au Whisky

Sorry about the shitty picture quality.

A very traditional a recipe - 1960ish. Delicious and simple but... loads of chocolate, too much per serving, heavy when eaten in volume. Therefore, use really small serving dishes and enjoy just a few scrumptious bites rather than stuffing oneself. The recipe really would be enough for 15 people but ... "what I really did" was...

Chocolate Mousse with Hazelnuts and Whiskey : Mousse au Chocolate aux Noisettes et au Whisky

Serves: 7 (or 15)
Ingredients
  • 500 gr semi-sweet chocolate [1 #]
  • 125 gr sugar [1/2 C]
  • 30 gr butter (unsalted, and definitely not margarine) [2 T, 1 oz]
  • 6 egg yolks
  • 90 ml Scotch Whisky [6 T]
  • 6 egg whites
  • 125 gr sugar [1/2 C]
Chantilly Cream
  • 250 ml [1 C] whipping cream [real, 35%]
  • 2 T icing sugar
  • 1/2 t vanilla extract (real)
Procedure
  1. Chocolate, sugar and butter into the double boiler (or alternate apparatus), in that sequence, melt it, do not touch/stir/mix (will mess it up)
    • It might not look melted but will visually soften and should be done enough in 10 minutes
  2. Remove from the heat/boiler
    • It ought to be about body temperature (& feel quite warm but not "hot" hot)
  3. Clop the egg yolks and add to the chocolate
  4. Then add the whiskey and hazelnuts/filberts
  5. Beat the egg whites to stiff peaks
  6. Add 1/3 of the 125 gr of sugar, beat a bit - repeat, repeat yet again
  7. Beat whites to stiff peaks again
  8. Stir 1/3 of the whites into the chocolate (stir, not fold)
  9. Fold the chocolate gently into the whites (fold, not stir)
  10. Pour, scoop into serving dishes
  11. Make the chantilly cream to decorate the top (an hour or so [maximum] before serving
    1. Beat the cream and vanilla until stiffening
    2. add the sugar (all at once would work)
    3. Beat until stiff peaks
    4. Pipe it with a star tip (or simply spoon it) decoratively in rosettes onto the top of the mousse
      • The extra cream goes in a bowl for the table for those who want extra

Done

Notes
  1. Prepare a day ahead - the flavors mix together better with time
  2. These are French recipes. They use lots of butter, eggs, cream, sugar and somehow the French manage to be healthier than North Americans; must be the wine they're drinking.
  3. Butter always means unsalted butter unless otherwise noted
  4. Melt the chocolate stuff in a double boiler or in a heatproof bowl over an inch of boiling water; the bowl must not touch the water by the way.
  5. Hazelnuts are also known as Filberts and, when toasted/roasted go very well with scotch whisky
  6. Egg whites are beaten at room temperature
  7. Cream is beaten cold, with a chilled bowl and beater
  8. The chantilly cream would have used 1/4 cup sugar to get the traditional "Chantilly Cream" proportions of 3,33:1 cream to sugar (by weight)

Eggs with Béchamel, Chocolate Mousse : LCB at Home : Lesson 3 : Part 1

Two less than stellar pictures; my own camera/phone was discharged - used a loaner.

First up was - Gratin of Hard-Boiled Egg : Oeufs à la Tripe
that would be "Eggs, Tripe-style"

Huevos con Bech 007

Second was:

Chocolate Mousse with Hazelnuts and Whisky : Mousse au Chocolate aux Noisettes et au Whisky

Choc Mousse 016

Opinions were: Eggs needed more salt & that they resembled Eggs Benedict; Chocolate Mousse was very intense, could have been in servings half the size and a modern treatment would have been much lighter.

Onwards to ... "what I actually did"

Gratin of Hard-Boiled Egg : Oeufs à la Tripe

Serves: 6
Ingredients
  • 10 eggs (large, probably)
  • 3 T butter (not margarine) [45 gr, 1.5 oz]
  • 1 large onion, julienne [sliced thinly]
    Béchamel
  • 3 T butter (not margarine) [45 gr, 1.5 oz]
  • 5 T flour (white, all purpose) [45 gr, 1.5 oz]
  • 1/2 t salt
  • 1/2 t white pepper, freshly ground
  • 2 giant dashes of freshly grated nutmeg [1/4 of a nut]
  • 2 C milk
Procedure
  1. Hard boil the eggs, peel, hold in warm water (I did this way in advance)
  2. 3 T butter into a pan - saute the onions - until soft but not colored (do this way in advance too)
  3. Make the béchamel:
    1. 3 T butter onto a saucepan, melt
    2. add flour, whisk around for 3 minutes; not too hot - avoid coloring the "roux" [flour & butter mixture]
    3. whisking all the while, add the milk, bring to a boil, keep whisking
    4. simmer it well for 10 minutes, keep on whisking, although gently now,
    5. switch to a wooden spoon for stirring the béchamel and add the sautéed onions, stir for 5 minutes more
  4. Pour a thin layer of béchamel into a gratin dish (or, in my case, 4 little ones)
  5. Sliced the eggs thin-ish, lay out in the dish
  6. Cover with more béchamel
  7. Stick under a broiler until browned (not burnt [like half of mine did])

Done

Notes
  1. Béchamel sauce is pretty easy to do, way way cheaper than store bought, and tastes distinctly better. Try it.
    • Béchamel is one of the basic "mother" sauces in cuisine. One you've got it down you can vary it to do loads of other interesting stuff
  2. Hard boiling eggs: lots of ways to do it. Today it was boil some salted water, lower eggs into boiling water using a slotted spoon, bring water back to a boil, lower to a simmer for 9 minutes, run under cold water to stop the cooking.
    • Do 11 eggs because one is certain to crack horribly and leak 3/4 into the water.
  3. If there's no real milk in house enhance each cup of skim or 2% or other fake milk with a couple of tablespoons of cream
  4. All the whisking of the béchamel is to get it light a and fluffy and to avoid lumps
  5. When the béchamel was ready I put it on hold by rubbing a patty of cold butter on the surface to prevent a skin from forming
  6. I revived the béchamel when I was plating the eggs by stirring, over a low heat, and adding enough additional milk to thin it back to a "thick sauce" consistency.
  7. After burning the béchamel while boiling on 2 of the little gratin dishes I peeled off the burnt "bech" and re-broiled them; no problem at all.

This post has taken quite a while to write; I'll publish it and get back to the thing about the Chocolate Mousse later.

Lesson 3 : LCB at Home : Eggs, Veal, Mousse

The adventure continues - people gotta be fed, after all - with Lesson 3; skipping lesson 2 for the moment to have a starter that is fit for a vegetarian who will be at the table.

But, this is the veal shanks...


The menu is:

Eggs Gratin : Oeufs à la Tripe : Gratin of Hard-Boiled Eggs

Veal Shanks Bourgeois : Roulles de Veau Bourgeoise : Veal Shanks with Pearl Onions and Mushrooms
(alt: vegetarian)
Ratatouille : Ratatouille Niçoise : Nice-Style Ratatouille

Chocolate Mousse : Mousse au Chocolate aux Noisettes et au Whisky : Chocolate Mousse with Hazelnuts and Whisky

There's three names in each item above because I give
What I would use on a menu : French title from the book : English title from the book

I find that menu listings are often too wordy these days.

The ratatouille is from lesson 44

Recipes and evaluations tomorrow.

Two Salads: LCB at Home: Lesson 1: Part 3

The final two dishes of the first lesson were uninspired. Not faulty execution - there just wasn't much to work with here. Yawners.

First was the Cucumber Salad (Concombre à la Menthe)

Peeled and sliced cucumbers with a yogurt & mint dressing (and a 1/2 tablespoon of red-wine vinegar and some fresh round pepper])

Not going to give the recipe and "what I actually did" because it really wasn't worth it.

Last was the Fresh Fruit Salad with Cointreau (Salade des Fruits)

Fine, just fine, but no "bling" at all.

One each of an apple, pear, banana, peach, orange (sliced carefully and the segments cut out with the membranes - that, at least, was interesting), couple of slices of pineapple, some strawberries (a little box). Augment that with the juice from an entire lemon and a tablespoon of Cointreau mixed with a 1/4 cup of fine sugar. Top, upon serving, with some sliced kiwi.
Nothing inspiring - nor is it "bad" in any way.

Poulet Roti: Roast Chicken: LCB at Home: Lesson 1: Part 2

The star of the show... ta da!

Poulet Rôti : Roast Chicken

Poulet avec salsa 090420081178

I did this same roast chicken during the course in Paris but forgot to review my notes from the course during this repeat and the result, although delicious, could have been even better. E.g. note the specks of pepper on the skin in the picture above - not the way to do it by Le Cordon Bleu methodology.

What I really did (will post, later, an improved version of this)

In this version it's really very simple and the result is quite good.

Poulet Rôti : Roast Chicken

Serves: 6
Ingredients
  • 1,5 kg chicken [3,5#]
  • 7 cloves garlic
  • salt
  • pepper
  • 1 bay leaf

  • 3 T butter
  • salt
  • pepper
Procedure
  1. Oven to 425 F [220 C]
  2. Wash and pat dry the chicken
  3. Remove the wishbone
  4. Salt & pepper the cavity
  5. Toss in the bay leaf and the garlic
  6. Truss the sucker to keep the legs and wings from flopping about
  7. Butter the outside
  8. Salt and pepper it
  9. Lay into a just barely big enough pan / on its side
    • Roast for 20 minutes
  10. Flip to the other side
    • Roast for 15 minutes
  11. Flip it breast up
    • Roast for 15 minutes
    • Until pricking it in the thigh results in the juices running clear (not pink/bloody)
  12. Remove from the pan to a platter
    • Cover with a tight tent of foil
  13. Skim the light fat from the leavings in the pan
  14. Add a touch of water (1/4 C maybe) to the pan and put in in the stovetop
  15. Reduce, scraping up any good toasted bits stuck to the bottom (you're making the jus [sauce] in this case)
    • Until just the juices are left and it's a little bit saucy
  16. Pour the settled juices from the resting chicken into the jus pan
    • Reduce a little more to incorporate these juices
  17. Strain the sauce
  18. Remove the string from trussing the chicken
  19. Pour sauce over the chicken (makes it look quite glossy)

Done

Notes
  1. I forgot to put some thyme into the chicken's cavity. Just plain oversight on my part.
  2. Use a ovenproof and fireproof pan
  3. I'll write about removing the wishbone some day. Rather too complicated to explain right now.
    The purpose of removing it, by the way, is to make it easier to carve the breast, later, without that wishbone getting in the way at one end of the knife stroke. (thanks Shauneen for pointing out that the motivation for this step was missing)

Spring Peas: LCB At Home: Lesson 1 : Part 1

Petite Pois à la Française : French Spring Peas :
Spring Peas with Lettuce, Chervil and Onions

It's going to take a couple of days to post the entire event which has four recipes involved; here's the first one.

My favorite bit while preparing this multi-part meal was the peas with onions side-dish. Pearl onions; thus, very French. Unfortunately fresh little pearl onions are nigh on impossible to come by in the Toronto area, couldn't even find the frozen variety; did find the dried version at $4 a pack of about 50 onion-ettes - which strikes me as pricey. Didn't have to use all of them so I'll have some left for next time.

This is the dish, completed, still on the stove.pois 090420081179

Then there was the spring peas issue. Too small - way too small. A kilo of pea pods produced a little more than a cup of shelled peas. Not enough. Supplemented them with (uggh) the frozen store sort.

Mini pois 090420081171

The key ingredients in this case are: peas, lettuce, and the onions

pois all 090420081174

Oh, and a bunch of parsley (couldn't find fresh chervil either) .

On to the what I really did...

Petite Pois à la Française : Spring Peas with Lettuce, Chervil and Onions

Serves: 4
Ingredients
  • half a dozen leaves from a large leaf lettuce (or one small head) (green parts only)
  • 1 kilo [2 #] spring peas (was 1 1/4 C shelled because they were tiny tiny tiny)
    • plus 2 C frozen green peas (to be avoided at any cost)
  • 20 pearl onions (dried)
  • small bunch of parsley (better would be chervil) (tied with string - to remove later)
  • 5 T butter (always we mean unsalted butter)
  • 1 ½ C water
  • 1 t salt
  • 1 ½ T sugar
Procedure
  1. Chiffonade the lettuce (roll the leaves then chop crosswise in finger-wide strips)
  2. Shell the spring peas
  3. Rinse frozen peas in water (this de-ices them a little)
  4. Dunk dried pearl onions in boiling water for 3 minutes, douse in cold water - then peel them
    • This water activity is all to make then easier to peel; peeling them "dry" is a pain
  5. Butter into a large saute pan; medium heat
  6. Add lettuce, peas, more peas and the onions
  7. Wilt the lettuce; stirring gently with a wooden spoon
  8. Add parsley bunch
  9. Add water, salt, sugar (sugar is essential in this dish)
  10. Reduce heat to low - cover
    • Simmer 15 minutes (until peas are tender) - up to maybe 25 minutes
  11. Remove parsley

Done

Notes
  1. Looks like I wrote the notes into the recipe - bad form on my part
  2. Lots of butter - it's a French dish
  3. Feel free to try to precook this about half way and then set it aside for "finishing" in the last 5 minutes - would probably work
  4. But it's not likely to reheat very well

And it was oh so very tasty.

From the book: Le Cordon Bleu: At Home

Le Cordon Bleu at Home: Lesson 1: Roast Chicken

I'm trying some recipes from my (maybe) favorite book (Le Cordon Bleu: At Home)- which aligns with my course at Le Cordon Bleu a few years back. I have a vague plan of doing one a week or so and working the way through the 90 (sets of recipes in there). Probably won't happen but it's a sort of cute idea anyway.

The first one is centered around Roast Chicken (Poulet Roti). Which came out looking like this...


not bad.
I failed to follow the notes I made from the course (see the 2nd #9 listed in the Course Notes blog)

The whole thing I did today will be posted over the next couple of days (this post being but a teaser for the ones following).

The menu:

  • Cucumber Salad with Mint
  • Poulet Roti
  • Spring Peas with Lettuce, Chervil & Onions
  • Fruit Salad with Cointreau
oddly enough there was also Patatas Barvas served; although not from the Cordon Bleu recipe

Roi San: Dim Sum

How about lunch for 2 for $12,50 Canadian (with taxes and tip).
Sound like a good deal? It is. Not expensive; excellent food.

Roi San restaurant on Spadina Avenue - "T" intersecting with St. Andrews at the 1st light north of Dundas.

Pork Dumplings (appears to have some roe sprinkled on top)


Calamari: Octopus tentacles - lightly battered


Eggplant (the long tubular sort, not the rotund ones) - filled with something & I have no idea what


Cuttlefish, curried (fuzzy picture)

Little Quails' Eggs

Classic Spanish tapa -
which I bit into before remembering to take the picture -

slice of baguette, small slice of what appears to be more or less Canadian bacon, topped with a tiny fried quail egg. Perfectly bite sized.

Spring

I'm visiting Toronto at the moment and although it's rather chilly as compared to the south of Spain there is some faint hope that spring may yet actually arrive (that is, arrive for real and not only based on the calendar)

Burgers & Views

Yet another burger. This time... on an island.
Okay - Angus beef. Nice location and...


... when returning from the restaurant the view, while waiting for the ferry, is this -

Spanakopita

Funny name; simple enough to make.


Spanakopita

Serves: 12
Ingredients
  • 1,25 kg [3#] fresh spinach
  • 1 onion, diced
  • olive oil
  • salt
  • 400 gr [15 oz] feta cheese
  • 350 gr [12 oz] cottage cheese
  • 5 eggs
  • 2 T flour
  • 1/2 C fresh dill
  • 1/2 C fresh basil
  • 1 entire package filo pastry dough [phyllo]
Procedure
  1. Trim the ends and wash the spinach
  2. Put into a really really big pot with a tiny bit of oil, some salt in the bottom and wilt the spinach until it's all soft
  3. Oil into a pan and sauté the onions
  4. Squeeze excess liquid from the spinach (maybe chop it up a little bit)
  5. Mix the cheeses and eggs (lumps of feta cheese are okay); mix in the onions; flour
  6. Mix with the spinach
  7. Lay 1/2 the filo dough into an oven sized baking pan; with the sheets hanging over the outside edges of the pan
  8. Spoon in the spinach mix
  9. Top with dill and basil (lots of it)
  10. Top with other 1/2 of the filo dough sheets
  11. Fold the outside edges of the filo layers over the top of the whole thing
  12. Bake: 180 C [375 F] for 40 minutes or until brown (time is, of course, approximate)

Done

Notes
  1. The filo dough is not layer and buttered, sheet by sheet, as in the usual recipe for this dish- - it's put in all in a clump.
Good warm or cold; keeps well for the next day, and the next.

Salmon Mayo Steak

Sort of a recipe today.

Was wracking my brain for something fast, simple and tasty (an alternative to Slow, Complicated and Awful ?) when fish was suggested.
More technique than recipe - - but it gets raves.


  • 3 Salmon steaks (2,5 cm [1"] thick)
  • 1/4 C mayo (the g00d stuff)
  • 2 T olive oil
  • 1 T dill
  • 2 T horseradish
  1. Oil a baking sheet, place steak on sheet
  2. Mix mayo, oil, dill & horseradish
  3. Spread mixture on top of salmon steaks
  4. Bake at 375 F [190 C] until top (mayo) is brown and fish is cooked (10 minutes maybe?)
The mayo mix has flavor and sort of melts down over the fish; nothing dries out - - delicious.
Make extra of the mayo mixture to eat with the salmon once it's on the plate.