Poulet Roti: Roast Chicken: LCB at Home: Lesson 1: Part 2
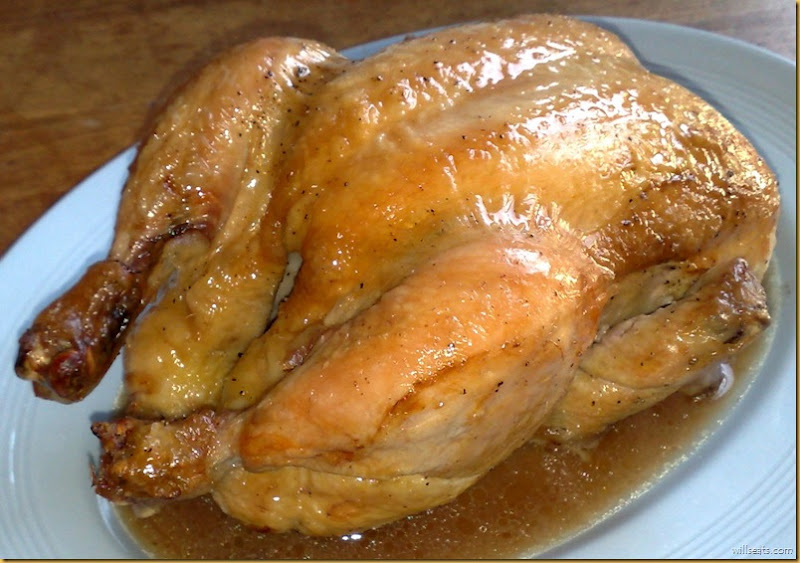
The star of the show... ta da!
Poulet Rôti : Roast Chicken
I did this same roast chicken during the course in Paris but forgot to review my notes from the course during this repeat and the result, although delicious, could have been even better. E.g. note the specks of pepper on the skin in the picture above - not the way to do it by Le Cordon Bleu methodology.
What I really did (will post, later, an improved version of this)
In this version it's really very simple and the result is quite good.
Poulet Rôti : Roast Chicken
Serves: 6
Ingredients
- 1,5 kg chicken [3,5#]
- 7 cloves garlic
- salt
- pepper
- 1 bay leaf
- 3 T butter
- salt
- pepper
Procedure
- Oven to 425 F [220 C]
- Wash and pat dry the chicken
- Remove the wishbone
- Salt & pepper the cavity
- Toss in the bay leaf and the garlic
- Truss the sucker to keep the legs and wings from flopping about
- Butter the outside
- Salt and pepper it
- Lay into a just barely big enough pan / on its side
- Roast for 20 minutes
- Flip to the other side
- Roast for 15 minutes
- Flip it breast up
- Roast for 15 minutes
- Until pricking it in the thigh results in the juices running clear (not pink/bloody)
- Remove from the pan to a platter
- Cover with a tight tent of foil
- Skim the light fat from the leavings in the pan
- Add a touch of water (1/4 C maybe) to the pan and put in in the stovetop
- Reduce, scraping up any good toasted bits stuck to the bottom (you're making the jus [sauce] in this case)
- Until just the juices are left and it's a little bit saucy
- Pour the settled juices from the resting chicken into the jus pan
- Reduce a little more to incorporate these juices
- Strain the sauce
- Remove the string from trussing the chicken
- Pour sauce over the chicken (makes it look quite glossy)
Done
Notes
- I forgot to put some thyme into the chicken's cavity. Just plain oversight on my part.
- Use a ovenproof and fireproof pan
- I'll write about removing the wishbone some day. Rather too complicated to explain right now.
The purpose of removing it, by the way, is to make it easier to carve the breast, later, without that wishbone getting in the way at one end of the knife stroke. (thanks Shauneen for pointing out that the motivation for this step was missing)


No comments:
Post a Comment