Tortilla Española, Estilo Nuevo : Spanish Tortilla, New Style : Deconstructed

A deconstructed Tortilla Española (Spanish Tortilla).

06092009618

Quite different than this normal looking tortilla:
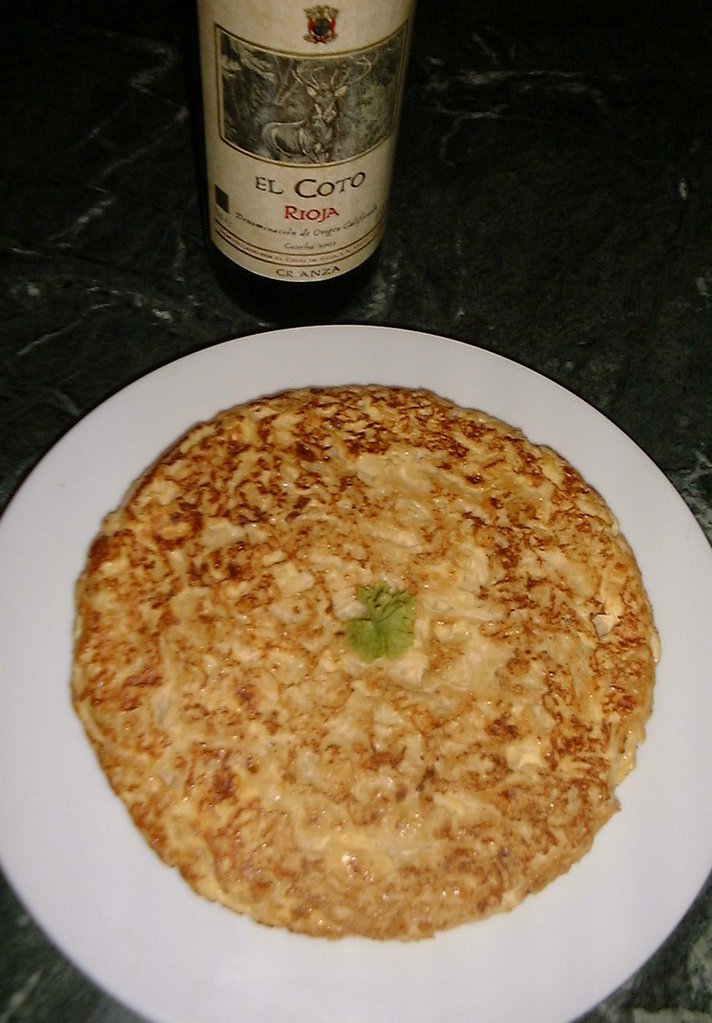
See also a post at Tortilla de Cebolla

Taking a page from Ferran Adrià (chef & sort of mad scientist) and his recipe for a modern tortilla; having three components: caramelized onions, a simple sabayon (egg) and potato foam (yes, that’s foamed potatoes.

Instead of mixing all the ingredients together they are separated and layered over each other. Taste them individually or dig through to the bottom and have all three together.

The following is what I actually did – with slight variance from his original recipe. It’s quite a bit easier than it might look at first glance.


Deconstructed Tortilla Española

Serves: 2

Ingredients

Caramelized Onions
  • 1/2 medium onion – julienned, finely sliced
  • 4 shallots – julienned, finely sliced (equal in amount to the onion)
  • 60 ml olive oil [1/4 C]
  • 1 T butter (or a little less)
  • 100 ml water [1/2 C]
  • salt
Sabayon
  • 2 egg yolks
  • 2 T boiling water
  • salt
Potato Foam
  • 150 gr potatoes [1/3 #] (that’s about 1 potato)
  • 75 ml cream (heavy/whipping cream) [1/2 C]
  • 2 T olive oil
  • salt

Procedure

Caramelized Onions
  1. Oil into a sauté pan, then the butter
  2. Sauté the onions and shallots slowly, until browning
    • takes about 20 minutes
    • stirring regularly or, if you have the patience, continuously
  3. Drain off any excess oil
  4. Add 1 T of water, stir, and continue until the water evaporates
    • repeat: water, stirring, cooking until the water’s gone (this could go for another 20 minutes)
    • You’re going for a jam consistency and golden brown color
  5. Salt to taste
Sabayon
  1. In a pan, whisk the egg yolks until creamy and consistent
    • getting air in the mix is just fine
  2. Add the boiling water in a drizzle and keep on whisking
  3. Whisk with enthusiasm over medium heat, maybe use a double boiler, until it’s emulsified
    • Don’t stop whisking or you might end up with scrambled eggs
    • When it’s ready it will just barely drip from the whisk and be really full of small bubbles
    • If you have an instant thermometer it would be 80 C [180F]
  4. Salt to taste (do not omit this step)
Potato Foam
  1. Peel, chunk and cook the potatoes until soft
    • Start the potatoes in cold, lightly salted water, just enough to cover
    • They’re ready when a knife goes in easily and slips out equally so
  2. Drain over a bowl, saving the cooking water
  3. Puree/blend the potatoes, with 3 T of the potato-water, and drizzle in the cream
  4. Then drizzle in the oil, pureeing the whole while
    • Until it’s smooth
  5. Salt to taste (don’t leave out this salt either)

You can stop now and resume later (see notes) or carry on right away.

Now comes the sort of complicated bit; you need a stainless steel whipped cream maker (1/2 liter [quart] size) (or see notes for a possible alternative)

  1. Strain the creamed potato into the whipper
  2. Charge (2 cartridges) the whipper
  3. Set in a pan of hot water, you can put the sabayon there too
Construction
  1. 1 T (heaping) caramelized onions in the bottom of a tapered glass
  2. Spoon in sabayon to cover
  3. Shake thrice and invert the whipper with the potato foam and spurt in a goodly quantity of potato. At least as deep as the other two layers
  4. Drizzle a little bit of olive oil on top

Done

Notes

  1. I made everything well in advance and stashed it in the fridge
  2. The sabayon firmed up quite a bit from the liquidy form it had when I finished making it. That didn’t matter since it was going between two other layers
  3. Warming the caramelized onions up in a sauté pan
  4. Warming the sabayon in a bain marie of hot water (just a biggish pot really)
  5. Warming the creamed potato in a pot, adding a touch (2 T?) of potato-water to make up for absorbed or evaporated liquid
  6. And then straining and charging the whipper with it and stashing it the bain maire
  7. The caramelized onions are quite thick and jammy. Don’t put too much in the glass. I probably overdid it.
  8. In the event that you don’t have a whipper/foamer I imagine you could whip up the creamed potatoes really well and end up with something sort of conceptually similar. Whip in large bowl with and electric whip and whip at the edge of the mixture to incorporate a lot of air. Cover half the top of the bowl with plastic film to avoid a huge mess.

Crème Brûlée without an oven

I wanted to make this classic, simple, dessert so I could use my kitchen blowtorch again. The challenge in this case is that at my current place I don’t have a regular oven (only a microwave) and this dish is normally cooked in the oven.

cremebrulee23082009601

The solution: create a Bain Marie on the stovetop with a frying pan. The capacity of this setup is rather limited, two at a time in this big frying pan, but it did work quite nicely.

cremebruleebath22082009589


Crème Brûlée

Serves: 2

Ingredients

  • 1 C heavy cream
  • 1 vanilla bean
  • 2 egg yolks
  • 2 T sugar

Procedure

  1. Split the vanilla bean and scrape the inside goop
  2. Heat the cream in a pan with the bean and its scrapings
    • just to when it starts to bubble
    • set aside for an hour or two to infuse the flavour of the vanilla
  3. In a bowl mix the egg yolks and sugar
    • Until it forms something like a ribbon when dripping off the whisk
    • Avoid getting it all foamy
  4. Reheat the cream to just bubbling
    • Remove the bean pod
  5. Add cream to the egg mixture
    • very slowly (to avoid cooking the egg with the hot cream)
  6. Strain the mixture (in case of any little lumps of cooked egg)
  7. Pour into some little dishes
  8. Place a few layers of kitchen paper in the frying pan
    • Splash in a bit of water to make things less slippy
  9. Put the molds in the pan
  10. Fill with hot water most of the way up the molds
  11. Keep the water just on the simmer
    • Add more hot water if the level drops much below 1/2 way on the molds (keep an eye on it – check every 15 minutes or so)
  12. Cook for an hour
    • Until the entire top of the custards are cooked over (it will be wiggly)
    • Most of the contents of the mold will still be liquid (not to worry)
  13. Chill a good 4 hours (or a day)
    • Cover once they’re cool
  14. Just before serving sprinkle sugar on the tops and toast with your blowtorch

Done

Notes

  1. Or cook in a medium oven and a pan of hot water for 35-45 minutes
  2. Mess with the sugar amount if you like it more or less sweet (I doubt honey would work in this recipe but it’s worth a shot)
  3. The recipe is halved in this case but you can easily halve, double or quintuple it.  It works well at almost any volume
  4. If they’re still liquidy after cooling you can redo the “cooking in a bain marie” process until you’re sure they’re done.  Give it two hours if you have to (but it won’t be)

Short version

  1. Infuse flavor into cream by cooking the cream and the flavour component (in this case, vanilla)
  2. Mix eggs and sugar together
  3. Add reheated cream to egg mixture, slowly, and strain to remove lumps (if any)
  4. Cook in a bain marie until the top is set; then chill (the custards)
  5. Decorate with toasted sugar


Technorati Tags: ,

Platanos : Banana Tree

One of the neighbours has a couple of banana trees in their front yard; one of which has branches hanging over the wall.  The end of the stalk has a weird  man eating looking flower which drips (blood?) onto the sidewalk.

The bananas looked almost ripe the other day.

platanos-19082009577

Alas, they’re too high off the ground to check them out. 

Chipirones en su tinta : Cuttlefish in ink sauce

You might not have ever eaten black food.  This is a good place to start.  It’s a very typical dish; a very small squid, the body stuffed with tentacles and the sauce made using the squid ink. Usually served with white rice - - for the contrast I guess.  I had it a while ago in a restaurant in town.

chipriones-26072009526 


Chipirones en su tinta : Cuttlefish in ink sauce

Serves: 4

Ingredients

  • 12 or so chipirones (little squid, cuttlefish) cleaned; 1kg [2#]
  • olive oil
  • 2 onions, chopped fine
  • 1 green pepper, chopped
  • 1/4 C parsely, chopped
  • 2 cloves of garlic, chopped
  • 1/2 C white wine
  • 1/4 C tomato sauce
  • 1 package squid ink

Procedure

  1. Clean the chipirones; see notes
    • chop
  2. Oil in a pan
  3. Onion in the pan, soften
  4. Add 1 of the garlic cloves
  5. Add the tentacles
  6. Sauté 5 minutes; just to color
  7. Add the parsely, stir
  8. Stuff into the bodies of the squid; seal the open ends (toothpicks?)
  9. In that same pan, more oil, fry the squid for color – set aside
  10. In that same pan, put the other onion - soften
  11. Add the other garlic clove
  12. Add the green pepper
  13. And the wine and tomato sauce
  14. Dilute the ink in a bit of wine and add that
  15. Add the rest of the wine
  16. Cook a good while (15 min)
  17. Puree the sauce; maybe with a stick mixer
  18. Add the squid to the sauce; bring to a boil and simmer 20 minutes
  19. Remove the toothpicks

Done

Notes

  1. Clean chipirones by removing the tentacles, eyes, beak and bone.  Keep the tentacles and the pouch
  2. If there’s not enough sauce when you add the squid to at least 1/2 cover then then use more wine or some fish stock

Had a bit of a fire the other day

The fire in the hills to the south-west eventually burned 14,000 acres.

smokeday2

made for some picturesque sunsets

smoke

and resulted in a lot of ash on the patios.

Il Pomodoro: Pizza Mexicano

The Pomodoro chiringuito (beach bar) and pizzería at Vera-Playa, Andalucía, Spain; at the right (south) end of the naturist zone (El Playazo beach).

A very nice pizza – I enjoyed it. 12 €. Tomato sauce, mozzarella, minced beef, onion, and hot sauce on a thin artisanal crust; nice and picante.pomodoro-pizza-mexicano-29072009533

Good char too from their wood burning oven.

pomodoro-char-29072009534

It had a little too much salt and I’m sure there could be a better quality mozzarella cheese. For those trying this at home remember that spicy foods require less salt than usual to bring out the flavor; the spiciness perks it up instead.

I’ll be back - to try the margherita pizza so that I can check out the tomato and cheese quality without the distraction of all the extra stuff.

After lunch you can take a walk on the beach to burn those extra calories; or have a siesta on a lounge under one of the sun umbrellas in front of the bar.

View from the Pomodoro

playa-29072009539
Click for panorama shot

The view from the pizzería on the beach a couple of hundred yards from my place. More about that later.

Albondigas de Iberica : Iberian Meatballs

albondigasdeiberica

With rice. These meatballs are made from the meat of Iberian pigs; the ones they use to make Iberian Ham (much better than Italian Prosciutto).

I hope I find the other phone-cam soon or I’m going to have to invest in some new equipment; the pictures with this substitute phone-cam suck.


Albondigas de Iberica : Iberian Meatballs

Serves: 4

Ingredients

  • 2 T lard (real lard)
  • 1 carrot, chopped
  • 1 onion, chopped
  • 3 cloves garlic, smashed
  • 1 cup ham/beef broth
  • 1/2 C dry white wine
  • pepper
  • 2 T olive oil
  • 500 gr [1#] Iberian meatballs (oh my! they were bought ready made)
  • 1/4 C dry white wine
  • 2 T tomato sauce
  • 1/2 C ham/beef broth

Procedure

  1. Melt lard in a pan
  2. Chop the veggies and garlic and toss into the hot lard
    • Medium heat, to soften the onions and until just picking up some color
  3. Add the wine (deglaze if needed and add the up of broth
    • Until the carrots are really soft
  4. Meanwhile, brown the meatballs in the olive oil
  5. Remove the browned meatballs and deglaze with the 1/4 C white wine
  6. Puree the carrot/onion mix with a stick blender
  7. Put the sauce into the meatball pan, season with pepper
  8. Add the tomato sauce, meatballs and the bayleaf
    • If needed add some ham/beef broth to make sure they’re 3/4 covered and that the sauce isn’t too thick
  9. Cover and simmer for 45 minutes (to cook the meatballs and blend flavours)

Done

Notes

  1. Use lard. It really does add something to the flavour
  2. I used artisanal, handmade, Iberian pork meatballs; faster than making them myself.
  3. Stick-blend the sauce until it’s really fine. This could take a minute or two.
  4. Served with rice: 2 parts rice to 2 parts ham/beef broth, 1 part wine and 1 part water
  5. This kind of sauce can be used with all sorts of dishes (substitute fish broth for fish dishes or veggie broth for vegetarian dishes). The basic idea of a carrot/onion/tomato sauce is very versatile and it makes a great base to braise things in.

Revuelto de Morcilla : Scrambled Blood Sausage

Catchy title, isn’t it? 

My good phone-camera is currently missing and I’m using a backup.  One which I have, obviously, not quite figured out.  If this pic looks less than appetizing it might be the camera’s fault (or the user thereof) or it might be what you opine regarding the ingredients  - - or maybe the appearance of the final dish.

revueltodemorcilla

It really is very tasty and it’s not just a made up dish.  You can get this in cafés ‘most everywhere.


Revuelto de Morcilla : Scrambled Morcilla

Serves: 4

Ingredients

  • oil, for frying, and lots of it
  • 1 very large potato (or 2 medium large)
  • 1 morcilla (also large)
  • 1 green pepper
  • 4 eggs, stirred up with a fork
  • a dash of salt or two

Procedure

  1. Peel then cut the potato into very thing julienne strips (we’re talking shoestring/straw potato sized)
  2. Place in a bowl of cold water, dump the water (essentially a rinse), refill with cold water and into the fridge for 20 minutes
  3. Peel the skin from the morcilla, cut into 1cm [1/2”] cubes
  4. De-seed the green peppers and cut into julienne [sticks]
    • The strips ought to be on the short side; maybe 4-5 cm [2”]
  5. Drain the potatoes; fry them up in a lot of hot oil until just turning brown (in a couple or three batches)
    • Dump the excess oil once the potatoes are done
  6. Fry up the green peppers, in a little oil, medium heat, until just softening
    • Add a dash of salt
    • set  them aside
  7. Fry up the morcilla, in a little oil, until just cooked
  8. Add the green peppers back, stir it around
  9. Add the eggs, stir it around until the egg-juice is just set (keep it moist – avoid over cooking and making it dry)
  10. Salt the shoestring potato straws
  11. Serve the scrambled up morcilla over a pile of potato straws

Done
Messy and odd looking but good

Notes

  1. I used fresh Morcilla of Burgos (rice and onion based)
  2. Chilling the potatoes in the fridge is important.  I think this step gets rid of excess starch so the potato straws stay nice and separate
  3. Red pepper works just fine as well
  4. Using 5 or 6 eggs would be okay too.  I went really quite light on the egg proportion
  5. Potato straws can be made hours in advance, no problem - - and they’re good all on their own.

Beef Chef Grill

There’s a new restaurant in town (bringing the total here in a suburb of Madrid to five).

Gazpacho
gazpacho

Do you see the chopped various things floating on it? (onions, green peppers, cucumber, tomato) This might or might not have been house-made gazpacho. Fine flavour but missing that special “something” that a real chef would have added to it. Maybe adding some really good olive oil would solve it? The croutins were definitely commercial; leave them out.

Grilled vegetables
grilledveg

Basic but tasty; and healthy too.

Roast beef
rosbief

Good presentation. Tasty. The gravy might have been a commercial product.

Lomo de buey
lomo

Standard Spanish fare. This one was done quite correctly.

Lunch menu: €14,50 including starter, main, café (or dessert) and a glass of house wine (which was either Rioja or Ribera).

Location: Las Matas de Las Rozas de Madrid - and they might have another branch in Leganes.

I think they will do well. I’ll be back; if only to try their hamburger. Good service. Decent price. Looks like it would a kid-welcoming place.

The mobile telephone with the 5 megapixel camera is missing at the moment. This was taken with a simpler phone-camera. I know, in know - if food blogging one should get a decent camera - - and one day I might.

Mid day Cafe

cafe2009061201

This was the lunch hour rush at a local café/pizzería (3:00). Not that the economy is having an impact or anything like that? It was a nice day, warm, not hot (85 rather than 95 for example) and just a 100 yards down from a hotel.

Maybe it’s not a good moment to be in the hospitality industry.

Hog Roast

hogroast2009061302

The local pub decided to roast a hog on the weekend.  Haven’t had one of these for years.

The cook, alas, elected to cater to the sensibilities if the visiting English clients and removed the head prior to spitting the pig.  Some of the best stuff is in there – brains for example – and the cheeks.

In any case, delicious.  Crackly skin and moist meat.

Recipe: Spit the animal; turn slowly over medium low flame; for 7 hours.

Inside the Pizza Oven

horno-21052009008

End of the shift at a pizzería.  The fire’s been allowed to die down; although the oven’s still blazing hot.  Shows that you don’t always need flames to cook a pizza in a wood burning oven (although it’s very colorful to have some).  That’s my pizza in there.  Note the nice puffy edges.

Baked Salmon

salmon-onions-05042009444


  • Sauté the onions (lots and lots; 4 or 5) until just barely soft.
    Cover the bottom of an ovenproof dish with olive oil & slightly sautéed onions.

  • Sprinkle thyme from your back porch garden on the salmon; salt and pepper (white pepper please)
    Place salmon filets on top of onions
    Sprinkle with white wine (1/4 C; not a lot) and lemon juice.

  • Bake at 150c (300F) for 10-15 minutes – or until just barely cooked.


Ta da!

Wine Selection

vino-21052009011


And they`re all eco, organic or biodynamic Spanish wines. At my favorite pizzería.